Showing posts with label Parameterized Test. Show all posts

Tuesday, 15 January 2019

Load Data from file in JMeter | Simulate Load with Unique Logins | Multiple User Login in JMeter

CSV Data Set Config


We cannot define a large data set in JMeter script and it is also not recommended to generate large set of random values at run-time as it is expensive in terms of CPU and memory. So we can create test data in advance and can be used as run-time parameter to create different sets of values from each run. Loading data from a file at run-time is cheaper than generating it. To Load data from a file 'CSV Data Set Config' is used in JMeter. 'CSV Data Set Config' is used to read lines from data file. Data is split according to the delimiter and assigned into variables. JMeter supports CSV files. CSV files which have a header line as the column names followed by data with new line. By using 'CSV Data Set Config' we can answer below questions.

How to load data from external data sources using JMeter
How to simulate load with concurrent unique logins using JMeter or Multiple User Login in JMeter


Multiple User Login Example: 

In this example we will load data from external data source and achieve Multiple User Login in JMeter. We will
  • Simulate a load test with 5 concurrent unique Login.
  • Username and password will be loaded from Data file.  


To do so please follow the below steps:

  • Create a test plan.
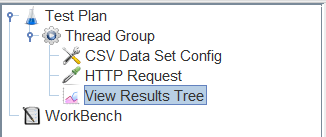
    • Test Plan contains one Thread Group. 
    • Thread Group contains: 
      •  “CSV Data Set Config” 
      •  “HTTP Request”. 
      •  “View Results Tree”


To step above Test Plan and HTTP request, please refer post: First HTTP request in JMeter | Running first JMeter Test

How to add CSV Data Set Config


  • Right-click on the Thread Group,
  • Select Add menu > Config Element > then select CSV Data Set.


CSV Data Set Config Settings:

Filename: Enter the file name only if file is present inside /bin directory else enter the complete path of file.

Variable Names(comma-delimited) : Enter the column names from the file. If headers are not present in the file then the entered variables are interpreted as the column names. JMeter supports CSV header lines: if the variable name field empty, then the first line of the file is read and interpreted as the list of column names.


Data File Configuration:

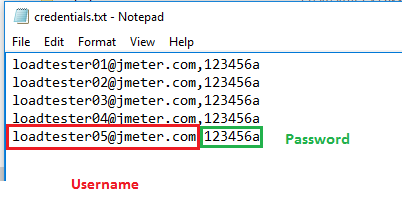
Data file contains Username and password for script as shown in figure below. Data file is stored in /bin directory and named as credentials.txt

Thread Group Configuration:

Define number of thread for test execution and duration. In this example we have set

No. of threads: 5
Ramp-up period: 1
Loop count : 1


View Results:

As you can see in figure below each thread has unique username associated with it. Total number of 5  requests are generated with different username.


Tuesday, 25 December 2018

Jenkins Publish HTML Report for JMeter Test

To publish HTML report in Jenkins, first setup HTML report generation for JMeter Test. Please refer post HTML Report for JMeter Test

Add Build Goal and Post Build Action


With Parameters


Without Parameters


Add Post Build Action > Publish HTML Report


Specify HTML report directory path as defined in POM 

${basedir}/target/jmeter/results/dashboard/index.html

HTML Report 


HTML Report for JMeter Test

To setup JMeter + Maven project in eclipse please refer post

Running JMeter Script from Eclipse in Maven project


We can create HTML report for Maven JMeter Test by following below points:


  • Create a source folder named src/test/resources
  • Copy/Paste reportgenerator.properties and report-template file/folder from JMeter/bin directory to src/test/resources
  • Update POM with CSV output_format property and add maven-antrun-plugin
  • Script Execution
  • HTML Report

Create New Source Folder


  • Project > Build Path > New Source Folder


  • Provide Folder name > src/test/resources


  • Project Hierarchy after folder creation


  • Copy/Paste reportgenerator.properties and report-template file/folder from apache-jmeter-x.x/bin directory to src/test/resources


  • Project Hierarchy after pasting above file/folder


Update POM 


  • Report generation requires csv output format, so we need to add 'jmeter.save.saveservice.output_format' jmeter property
<jmeter.save.saveservice.output_format>csv</jmeter.save.saveservice.output_format>

  • Add maven-antrun-plugin and define task.
    Also, Please make sure your version of Apache JMeter Jar and add it accordingly to POM
    ${basedir}/target/jmeter/bin/ApacheJMeter-3.1.jar version 
<plugin>
    <artifactId>maven-antrun-plugin</artifactId>
    <executions>
        <execution>
            <phase>pre-site</phase>
            <configuration>
                <tasks>
                    <delete dir="${basedir}/target/jmeter/results/dashboard" />
                    <mkdir dir="${basedir}/target/jmeter/results/dashboard" />
                    <copy file="${basedir}/src/test/resources/reportgenerator.properties"
         tofile="${basedir}/target/jmeter/bin/reportgenerator.properties" />
                    <copy todir="${basedir}/target/jmeter/bin/report-template">
                        <fileset dir="${basedir}/src/test/resources/report-template" />
                    </copy>
                    <java jar="${basedir}/target/jmeter/bin/ApacheJMeter-3.1.jar" fork="true">
                        <arg value="-g" />
                        <arg value="${basedir}/target/jmeter/results/*.jtl" />
                        <arg value="-o" />
                        <arg value="${basedir}/target/jmeter/results/dashboard/" />
                    </java>
                </tasks>
            </configuration>
            <goals>
                <goal>run</goal>
            </goals>
        </execution>
    </executions>
</plugin>

  • Complete POM

<project
    xmlns="http://maven.apache.org/POM/4.0.0"
    xmlns:xsi="http://www.w3.org/2001/XMLSchema-instance"
 xsi:schemaLocation="http://maven.apache.org/POM/4.0.0 http://maven.apache.org/xsd/maven-4.0.0.xsd">
    <modelVersion>4.0.0</modelVersion>
    <groupId>example</groupId>
    <artifactId>example</artifactId>
    <version>0.0.1-SNAPSHOT</version>
    <packaging>jar</packaging>
    <name>example</name>
    <url>http://maven.apache.org</url>
    <properties>
        <project.build.sourceEncoding>UTF-8</project.build.sourceEncoding>
    </properties>
    <dependencies>
        <dependency>
            <groupId>junit</groupId>
            <artifactId>junit</artifactId>
            <version>3.8.1</version>
            <scope>test</scope>
        </dependency>
    </dependencies>
    <build>
        <plugins>
            <plugin>
                <groupId>com.lazerycode.jmeter</groupId>
                <artifactId>jmeter-maven-plugin</artifactId>
                <version>2.1.0</version>
                <configuration>
                    <testResultsTimestamp>false</testResultsTimestamp>
                    <propertiesUser>
                        <threads>${threadCount}</threads>
                        <rampup>${rampupTime}</rampup>
                        <duration>${durationSecond}</duration>
                        <jmeter.save.saveservice.output_format>csv</jmeter.save.saveservice.output_format>
                    </propertiesUser>
                </configuration>
                <executions>
                    <execution>
                        <id>jmeter-tests</id>
                        <phase>verify</phase>
                        <goals>
                            <goal>jmeter</goal>
                        </goals>
                    </execution>
                </executions>
            </plugin>
            <plugin>
                <artifactId>maven-antrun-plugin</artifactId>
                <executions>
                    <execution>
                        <phase>pre-site</phase>
                        <configuration>
                            <tasks>
                                <delete dir="${basedir}/target/jmeter/results/dashboard" />
                                <mkdir dir="${basedir}/target/jmeter/results/dashboard" />
                                <copy file="${basedir}/src/test/resources/reportgenerator.properties"
         tofile="${basedir}/target/jmeter/bin/reportgenerator.properties" />
                                <copy todir="${basedir}/target/jmeter/bin/report-template">
                                    <fileset dir="${basedir}/src/test/resources/report-template" />
                                </copy>
                                <java jar="${basedir}/target/jmeter/bin/ApacheJMeter-3.1.jar" fork="true">
                                    <arg value="-g" />
                                    <arg value="${basedir}/target/jmeter/results/*.jtl" />
                                    <arg value="-o" />
                                    <arg value="${basedir}/target/jmeter/results/dashboard/" />
                                </java>
                            </tasks>
                        </configuration>
                        <goals>
                            <goal>run</goal>
                        </goals>
                    </execution>
                </executions>
            </plugin>
        </plugins>
    </build>
</project>

Script Execution with Parameters

mvn verify -DthreadCount=20 -DrampupTime=5 -DdurationSecond=60 pre-site


Script Execution without Parameters

mvn verify pre-site


HTML Report will be available at

${basedir}/target/jmeter/results/dashboard/index.html


Monday, 24 December 2018

Run Parameterized JMeter Test in Jenkins

Prerequisites to Run Parameterized Jmeter Test in Jenkins 


Create Parameters in Jenkins


  • Configure an existing/new job > Select 'This Project is Parameterized'


  • Add Parameter > Add 'String Parameter'


  • Define Parameter name and value

  • Add parameter in Maven Goal in Jenkins
clean verify -DthreadCount=$ThreadCount


    threadCount - variable defined in POM.xml
    ThreadCount - varaible defined as Jenkins parameter

    • Save and Build project.